
Quick start tutorial for machine learning#
This notebook provides a quick overview of developing serverless functions to train and deploy models using the MLRun AI orchestration framework.
In this tutorial
Install MLRun#
MLRun has a backend service that can run locally or over Kubernetes (preferred). See the instructions for installing it over Kubernetes Cluster. Alternatively, you can use Iguazio's managed MLRun service.
Before you start, make sure the MLRun client package is installed and configured properly:
This notebook uses sklearn. If it is not installed in your environment, run !pip install scikit-learn~=1.5.1.
# Install MLRun and sklearn, run this only once (restart the notebook after the install !!!)
%pip install mlrun scikit-learn~=1.5.1
Restart the notebook kernel after the pip installation.
import mlrun
Configure the client environment#
MLRun client connects to the local or remote MLRun service/cluster using a REST API. To configure the service address, credentials, and default settings, you use the mlrun.set_environment() method, or environment variables, (see details in Set up your client environment.)
You can skip this step when using MLRun Jupyter notebooks or Iguazio's managed notebooks.
Define MLRun project and ML functions#
MLRun Project is a container for all your work on a particular activity or application. Projects host functions, workflow,
artifacts, secrets, and more. Projects have access control and can be accessed by one or more users. They are usually associated with a GIT and interact with CI/CD frameworks for automation.
See the MLRun Projects documentation.
Create a new project
project = mlrun.get_or_create_project("tutorial", "./", user_project=True)
MLRun serverless functions specify the source code, base image, extra package requirements, runtime engine kind (batch job, real-time serving, spark, dask, etc.), and desired resources (cpu, gpu, mem, storage, …). The runtime engines (local, job, Nuclio, Spark, etc.) automatically transform the function code and spec into fully managed and elastic services that run over Kubernetes.
Function source code can come from a single file (.py, .ipynb, etc.) or a full archive (git, zip, tar). MLRun can execute an entire file/notebook or specific function classes/handlers.
Note
The @mlrun.handler is a decorator that logs the returning values to MLRun as configured. This example uses the default settings so that it logs a dataset (pd.DataFrame) and a string value by getting the returned objects types. In addition to logging outputs, the decorator can parse incoming inputs to the required type. For more info, see the mlrun.handler documentation.
Function code
Run the following cell to generate the data prep file (or copy it manually):
%%writefile src/data-prep.py

import pandas as pd
from sklearn.datasets import load_breast_cancer


def breast_cancer_generator():
    """
    A function which generates the breast cancer dataset
    """
    breast_cancer = load_breast_cancer()
    breast_cancer_dataset = pd.DataFrame(
        data=breast_cancer.data, columns=breast_cancer.feature_names
    )
    breast_cancer_labels = pd.DataFrame(data=breast_cancer.target, columns=["label"])
    breast_cancer_dataset = pd.concat(
        [breast_cancer_dataset, breast_cancer_labels], axis=1
    )

    return breast_cancer_dataset, "label"
Overwriting src/data-prep.py
Create a serverless function object from the code above, and register it in the project
data_gen_fn = project.set_function(
    "src/data-prep.py",
    name="data-prep",
    kind="job",
    image="mlrun/mlrun",
    handler="breast_cancer_generator",
)
project.save()  # save the project with the latest config
<mlrun.projects.project.MlrunProject at 0x7f15e3d604f0>
Run your data processing function and log artifacts#
Functions are executed (using the CLI or SDK run command) with an optional handler, various params, inputs, and resource requirements. This generates a run object that can be tracked through the CLI, UI, and SDK. Multiple functions can be executed and tracked as part of a multi-stage pipeline (workflow).
Note
When a function has additional package requirements, or needs to include the content of a source archive,
you must first build the function using the project.build_function() method.
The local flag indicates if the function is executed locally or "teleported" and executed in the Kubernetes cluster. The execution progress and results can be viewed in the UI (see hyperlinks below).
Run using the SDK
gen_data_run = project.run_function(
    "data-prep", local=True, returns=["dataset", "label_column"]
)
> 2025-05-16 11:44:29,953 [info] Storing function: {"db":"http://mlrun-api:8080","name":"data-prep-breast-cancer-generator","uid":"44df93034bab4e13b5b351ea895a5588"}
| project | uid | iter | start | end | state | kind | name | labels | inputs | parameters | results | artifact_uris |
|---|---|---|---|---|---|---|---|---|---|---|---|---|
| tutorial-shapira | 0 | May 16 11:44:30 | NaT | completed | run | data-prep-breast-cancer-generator | v3io_user=shapira kind=local owner=shapira host=jupyter-shapira-665ddf954b-jscr6 |
label_column=label |
dataset=store://datasets/tutorial-shapira/data-prep-breast-cancer-generator_dataset#0@44df93034bab4e13b5b351ea895a5588^f8f857aba6fa5bdf3d09b24c4007c8264bb8c823 |
> 2025-05-16 11:44:33,190 [info] Run execution finished: {"name":"data-prep-breast-cancer-generator","status":"completed"}
Print the run state and outputs
gen_data_run.state()
'completed'
gen_data_run.outputs
{'label_column': 'label',
 'dataset': 'store://datasets/tutorial-shapira/data-prep-breast-cancer-generator_dataset:latest@44df93034bab4e13b5b351ea895a5588^f8f857aba6fa5bdf3d09b24c4007c8264bb8c823'}
Print the output dataset artifact (DataItem object) as dataframe
gen_data_run.artifact("dataset").as_df().head()
| mean radius | mean texture | mean perimeter | mean area | mean smoothness | mean compactness | mean concavity | mean concave points | mean symmetry | mean fractal dimension | ... | worst texture | worst perimeter | worst area | worst smoothness | worst compactness | worst concavity | worst concave points | worst symmetry | worst fractal dimension | label | |
|---|---|---|---|---|---|---|---|---|---|---|---|---|---|---|---|---|---|---|---|---|---|
| 0 | 17.99 | 10.38 | 122.80 | 1001.0 | 0.11840 | 0.27760 | 0.3001 | 0.14710 | 0.2419 | 0.07871 | ... | 17.33 | 184.60 | 2019.0 | 0.1622 | 0.6656 | 0.7119 | 0.2654 | 0.4601 | 0.11890 | 0 |
| 1 | 20.57 | 17.77 | 132.90 | 1326.0 | 0.08474 | 0.07864 | 0.0869 | 0.07017 | 0.1812 | 0.05667 | ... | 23.41 | 158.80 | 1956.0 | 0.1238 | 0.1866 | 0.2416 | 0.1860 | 0.2750 | 0.08902 | 0 |
| 2 | 19.69 | 21.25 | 130.00 | 1203.0 | 0.10960 | 0.15990 | 0.1974 | 0.12790 | 0.2069 | 0.05999 | ... | 25.53 | 152.50 | 1709.0 | 0.1444 | 0.4245 | 0.4504 | 0.2430 | 0.3613 | 0.08758 | 0 |
| 3 | 11.42 | 20.38 | 77.58 | 386.1 | 0.14250 | 0.28390 | 0.2414 | 0.10520 | 0.2597 | 0.09744 | ... | 26.50 | 98.87 | 567.7 | 0.2098 | 0.8663 | 0.6869 | 0.2575 | 0.6638 | 0.17300 | 0 |
| 4 | 20.29 | 14.34 | 135.10 | 1297.0 | 0.10030 | 0.13280 | 0.1980 | 0.10430 | 0.1809 | 0.05883 | ... | 16.67 | 152.20 | 1575.0 | 0.1374 | 0.2050 | 0.4000 | 0.1625 | 0.2364 | 0.07678 | 0 |
5 rows × 31 columns
Train a model using an MLRun built-in Function Hub#
MLRun provides a Function Hub that hosts a set of pre-implemented and validated ML, DL, and data processing functions.
You can import the auto-trainer hub function that can: train an ML model using a variety of ML frameworks; generate
various metrics and charts; and log the model along with its metadata into the MLRun model registry.
# Import the function
trainer = mlrun.import_function("hub://auto_trainer")
See the auto_trainer function usage instructions in the Function Hub or by typing trainer.doc()
Run the function on the cluster (if there is)
trainer_run = project.run_function(
    trainer,
    inputs={"dataset": gen_data_run.outputs["dataset"]},
    params={
        "model_class": "sklearn.ensemble.RandomForestClassifier",
        "train_test_split_size": 0.2,
        "label_columns": "label",
        "model_name": "cancer",
    },
    handler="train",
)
> 2025-05-16 11:44:33,470 [info] Storing function: {"db":"http://mlrun-api:8080","name":"auto-trainer-train","uid":"e8d50fa21b1347a6a9f6b89844af9cbd"}
> 2025-05-16 11:44:33,719 [info] Job is running in the background, pod: auto-trainer-train-s9c54
> 2025-05-16 11:44:43,471 [info] Sample set not given, using the whole training set as the sample set
> 2025-05-16 11:44:44,667 [info] training 'cancer'
> 2025-05-16 11:44:46,206 [info] To track results use the CLI: {"info_cmd":"mlrun get run e8d50fa21b1347a6a9f6b89844af9cbd -p tutorial-shapira","logs_cmd":"mlrun logs e8d50fa21b1347a6a9f6b89844af9cbd -p tutorial-shapira"}
> 2025-05-16 11:44:46,206 [info] Or click for UI: {"ui_url":"https://dashboard.default-tenant.app.iguazio.com/mlprojects/tutorial-shapira/jobs/monitor-jobs/auto-trainer-train/e8d50fa21b1347a6a9f6b89844af9cbd/overview"}
> 2025-05-16 11:44:46,207 [info] Run execution finished: {"name":"auto-trainer-train","status":"completed"}
| project | uid | iter | start | end | state | kind | name | labels | inputs | parameters | results | artifacts |
|---|---|---|---|---|---|---|---|---|---|---|---|---|
| tutorial-shapira | 0 | May 16 11:44:41 | 2025-05-16 11:44:46.199838+00:00 | completed | run | auto-trainer-train | v3io_user=shapira kind=job owner=shapira mlrun/client_version=1.8.0-rc45 mlrun/client_python_version=3.9.18 host=auto-trainer-train-s9c54 |
dataset |
model_class=sklearn.ensemble.RandomForestClassifier train_test_split_size=0.2 label_columns=label model_name=cancer |
accuracy=0.9736842105263158 f1_score=0.9790209790209791 precision_score=0.958904109589041 recall_score=1.0 |
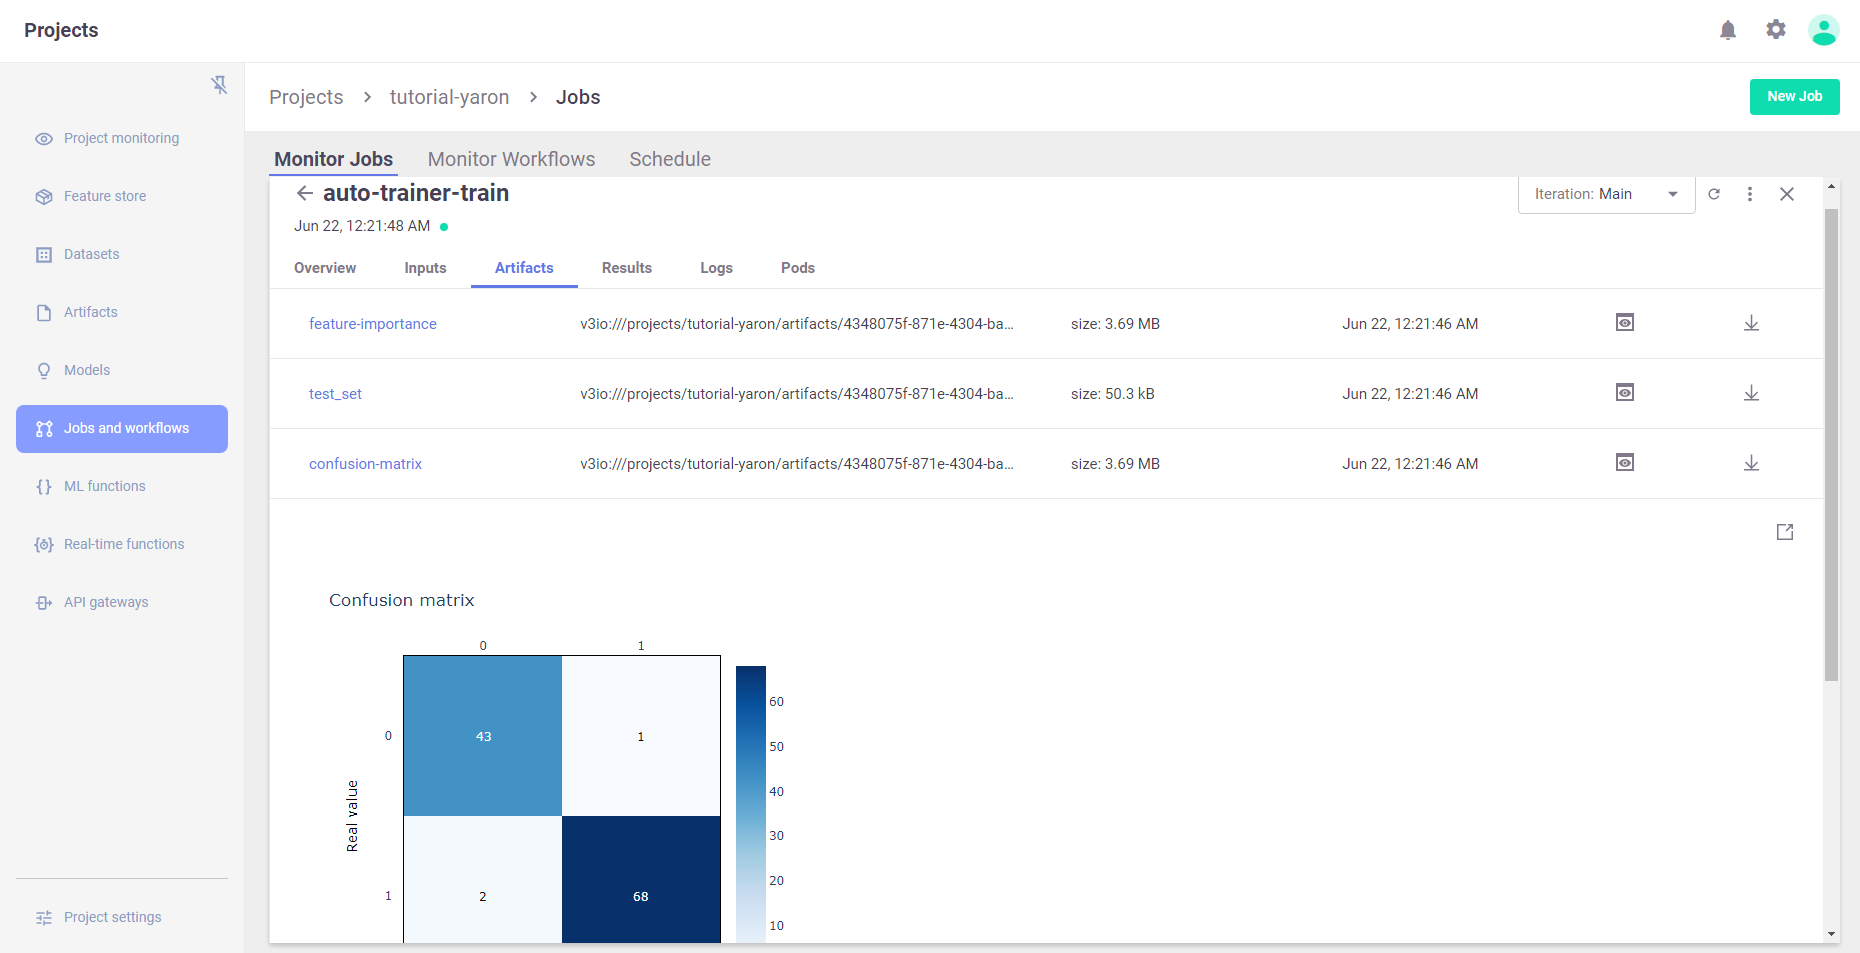
model calibration-curve roc-curves confusion-matrix test_set feature-importance |
> 2025-05-16 11:44:49,880 [info] Run execution finished: {"name":"auto-trainer-train","status":"completed"}
View the job progress results and the selected run in the MLRun UI
Results (metrics) and artifacts are generated and tracked automatically by MLRun
trainer_run.outputs
{'accuracy': 0.9736842105263158,
 'f1_score': 0.9790209790209791,
 'precision_score': 0.958904109589041,
 'recall_score': 1.0,
 'feature-importance': 'v3io:///projects/tutorial-shapira/artifacts/auto-trainer-train/0/feature-importance.html',
 'test_set': 'store://datasets/tutorial-shapira/auto-trainer-train_test_set:latest@e8d50fa21b1347a6a9f6b89844af9cbd^ed5d19399c06b3ec6427b51cfa968fb03d3ee97e',
 'confusion-matrix': 'v3io:///projects/tutorial-shapira/artifacts/auto-trainer-train/0/confusion-matrix.html',
 'roc-curves': 'v3io:///projects/tutorial-shapira/artifacts/auto-trainer-train/0/roc-curves.html',
 'calibration-curve': 'v3io:///projects/tutorial-shapira/artifacts/auto-trainer-train/0/calibration-curve.html',
 'model': 'store://models/tutorial-shapira/cancer:latest@e8d50fa21b1347a6a9f6b89844af9cbd^6a3232f4d249b3ccdd6c356fdda00bf966c8b128'}
# Display HTML output artifacts
trainer_run.artifact("confusion-matrix").show()
Build, test, and deploy the model serving functions#
MLRun serving can produce managed, real-time, serverless, pipelines composed of various data processing and ML tasks. The pipelines use the Nuclio real-time serverless engine, which can be deployed anywhere. For more details and examples, see MLRun serving graphs.
Create a model serving function
serving_fn = project.set_function(
    func="",
    name="serving",
    image="mlrun/mlrun",
    kind="serving",
    requirements=["scikit-learn~=1.5.1"],
)
> 2025-05-16 11:44:50,190 [info] Function code not specified, setting entry point to image
Add a model
The basic serving topology supports a router with multiple child models attached to it.
The function.add_model() method allows you to add models and specify the name, model_path (to a model file, dir, or artifact), and the serving class (built-in or user defined).
serving_fn.add_model(
    "cancer-classifier",
    model_path=trainer_run.outputs["model"],
    class_name="mlrun.frameworks.sklearn.SKLearnModelServer",
)
<mlrun.serving.states.TaskStep at 0x7f151c835c10>
# Plot the serving graph topology
serving_fn.spec.graph.plot(rankdir="LR")

Simulating the model server locally
# Create a mock (simulator of the real-time function)
server = serving_fn.to_mock_server()
> 2025-05-16 11:44:50,432 [warning] run command, file or code were not specified
> 2025-05-16 11:44:52,267 [info] model cancer-classifier was loaded
> 2025-05-16 11:44:52,268 [info] Loaded ['cancer-classifier']
Test the mock model server endpoint
List the served models
server.test("/v2/models/", method="GET")
{'models': ['cancer-classifier']}
Infer using test data
my_data = {
    "inputs": [
        [
            1.371e01,
            2.083e01,
            9.020e01,
            5.779e02,
            1.189e-01,
            1.645e-01,
            9.366e-02,
            5.985e-02,
            2.196e-01,
            7.451e-02,
            5.835e-01,
            1.377e00,
            3.856e00,
            5.096e01,
            8.805e-03,
            3.029e-02,
            2.488e-02,
            1.448e-02,
            1.486e-02,
            5.412e-03,
            1.706e01,
            2.814e01,
            1.106e02,
            8.970e02,
            1.654e-01,
            3.682e-01,
            2.678e-01,
            1.556e-01,
            3.196e-01,
            1.151e-01,
        ]
    ]
}
server.test("/v2/models/cancer-classifier/infer", body=my_data)
X does not have valid feature names, but RandomForestClassifier was fitted with feature names
{'id': '8a9f32c2ab64457d846586678a01db16',
 'model_name': 'cancer-classifier',
 'outputs': [0],
 'timestamp': '2025-05-16 11:44:52.299868+00:00'}
Read the model name, ver and schema (input and output features)
Deploy a real-time serving function (over Kubernetes or Docker)
This section requires Nuclio to be installed (over k8s or Docker).
Use the mlrun deploy_function() method to build and deploy a Nuclio serving function from your serving-function code.
You can deploy the function object (serving_fn) or reference pre-registered project functions.
project.deploy_function(serving_fn)
> 2025-05-16 11:44:52,320 [info] Starting remote function deploy
2025-05-16 11:44:52  (info) Deploying function
2025-05-16 11:44:52  (info) Building
2025-05-16 11:44:52  (info) Staging files and preparing base images
2025-05-16 11:44:52  (warn) Using user provided base image, runtime interpreter version is provided by the base image
2025-05-16 11:44:52  (info) Building processor image
2025-05-16 11:45:58  (info) Build complete
2025-05-16 11:46:30  (info) Function deploy complete
> 2025-05-16 11:46:33,363 [info] Model endpoint creation task completed with state succeeded
> 2025-05-16 11:46:33,364 [info] Successfully deployed function: {"external_invocation_urls":["tutorial-shapira-serving.default-tenant.app.iguazio.com/"],"internal_invocation_urls":["nuclio-tutorial-shapira-serving.default-tenant.svc.cluster.local:8080"]}
DeployStatus(state=ready, outputs={'endpoint': 'http://tutorial-shapira-serving.default-tenant.app.iguazio.com/', 'name': 'tutorial-shapira-serving'})
Test the live endpoint
serving_fn.invoke("/v2/models/cancer-classifier/infer", body=my_data)
> 2025-05-16 11:46:33,414 [info] Invoking function: {"method":"POST","path":"http://nuclio-tutorial-shapira-serving.default-tenant.svc.cluster.local:8080/v2/models/cancer-classifier/infer"}
{'id': '7878aeef-af68-45c0-9341-b11bcc768d17',
 'model_name': 'cancer-classifier',
 'outputs': [0],
 'timestamp': '2025-05-16 11:46:33.437226+00:00',
 'model_endpoint_uid': 'fe135b8ef3f44845aff89288b1a97a5c'}
Done!#
Congratulations! You've completed Part 1 of the MLRun getting-started tutorial. Proceed to Part 2: Train, compare, and register models to learn how to train an ML model.